Diễn đàn đan móc
6 M006 11/5/2009, 21:41
Rosa
Người điều hành diễn đàn

Được sửa bởi Rosa ngày 27/12/2010, 16:23; sửa lần 1.
7 M007 19/5/2009, 03:46
Rosa
Người điều hành diễn đàn

- Spoiler:
- Terminology
ch chain
sc single crochet (double crochet for UK/Aus)
st stitch
sc2tog single crochet decrease (insert hook into stitch and draw up a loop, insert hook into next stitch and draw up a loop, yarn over and draw through all 3 loops on hook)
FL front loops
BL back loops
Notes
• Do not join at the end of each round; rounds are worked in continuous spirals.
• Use a stitch marker to mark the beginning of each round. Move the marker up each time you start a new round.
You will need…
• E US/3.5mm crochet hook
• Small amount of worsted weight yarn in red, green and yellow
• Yarn needle to weave in ends
• Stitch marker
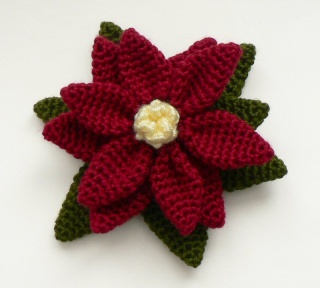
I used worsted weight yarn and a size E hook, which produced a large 6.5″ diameter flower. Try using a finer yarn or crochet thread with a correspondingly smaller hook to give a more compact flower.
Ingredients
Large Poinsettia:
* 6 of Style A in red
* 6 of Style B in red or green
* 6 of Style C in green
* 1 centre in yellow
Small Poinsettia:
* 6 of Style A in red
* 6 of Style B in green
* 1 centre in yellow
Crochet Instructions
Style A
Make a magic ring, ch 1.
Rnd 1: 4 sc in magic ring. (4 st)
Rnd 2: (2sc in next st, sc in next st) twice. (6 st)
Rnd 3: (2 sc in next st, sc in next 2 st) twice. (8 st)
Rnd 4: (2 sc in next st, sc in next 3 st) twice. (10 st)
Rnd 5: (2 sc in next st, sc in next 4 st) twice. (12 st)
Rnd 6: (2 sc in next st, sc in next 5 st) twice. (14 st)
Rnds 7-8: sc in each st around. (14 st)
Rnd 9: (sc2tog, sc in next 5 st) twice. (12 st)
Rnd 10: (sc2tog, sc in next 4 st) twice. (10 st)
Rnd 11: (sc2tog, sc in next 3 st) twice. (8 st)
Join with sl st to next st. Fasten off, leaving long end of yarn.
Style B
Make a magic ring, ch 1.
Rnd 1: 4 sc in magic ring. (4 st)
Rnd 2: (2sc in next st, sc in next st) twice. (6 st)
Rnd 3: (2 sc in next st, sc in next 2 st) twice. (8 st)
Rnd 4: (2 sc in next st, sc in next 3 st) twice. (10 st)
Rnd 5: (2 sc in next st, sc in next 4 st) twice. (12 st)
Rnd 6: (2 sc in next st, sc in next 5 st) twice. (14 st)
Rnd 7: (2 sc in next st, sc in next 6 st) twice. (16 st)
Rnd 8: sc in each st around. (16 st)
Rnd 9: (sc2tog, sc in next 6 st) twice. (14 st)
Rnd 10: (sc2tog, sc in next 5 st) twice. (12 st)
Rnd 11: (sc2tog, sc in next 4 st) twice. (10 st)
Rnd 12: (sc2tog, sc in next 3 st) twice. (8 st)
Join with sl st to next st. Fasten off, leaving long end of yarn.
Style C
Make a magic ring, ch 1.
Rnd 1: 4 sc in magic ring. (4 st)
Rnd 2: (2sc in next st, sc in next st) twice. (6 st)
Rnd 3: (2 sc in next st, sc in next 2 st) twice. (8 st)
Rnd 4: (2 sc in next st, sc in next 3 st) twice. (10 st)
Rnd 5: (2 sc in next st, sc in next 4 st) twice. (12 st)
Rnd 6: (2 sc in next st, sc in next 5 st) twice. (14 st)
Rnd 7: (2 sc in next st, sc in next 6 st) twice. (16 st)
Rnd 8: (2 sc in next st, sc in next 7 st) twice. (18 st)
Rnds 9-10: sc in each st around. (18 st)
Rnd 11: (sc2tog, sc in next 7 st) twice. (16 st)
Rnd 12: (sc2tog, sc in next 6 st) twice. (14 st)
Rnd 13: (sc2tog, sc in next 5 st) twice. (12 st)
Rnd 14: (sc2tog, sc in next 4 st) twice. (10 st)
Rnd 15: (sc2tog, sc in next 3 st) twice. (8 st)
Join with sl st to next st. Fasten off, leaving long end of yarn.
Centre
Make a magic ring, ch 1.
Rnd 1: 6 sc in magic ring. (6 st)
Rnd 2: in FL only, (sc, ch2, sc) in each st around. (6 st)
Rnd 3: in remaining BL of Rnd 1, 5 sc in each st around. (30 st)
The stitches of Rnd 3 will want to crinkle up into a loopy ruffle - let them do this! You want them to stick up to form the centre flowers of the poinsettia.
Assembly Instructions
Style A
1. Flatten out each petal/leaf.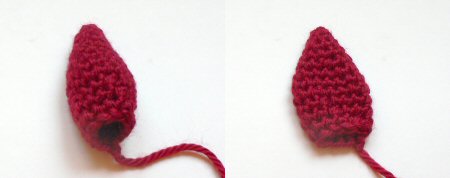
2. Fold the petal up along the centre line, so the two ends of the open edge meet. Using a yarn needle and the long yarn end, make a couple of stitches at the open edge between the two ends, to keep them together.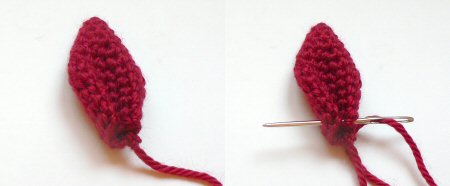
3. String all 6 petals together by running a length of yarn on a yarn needle (you can use one of the yarn ends or cut a new length) through the folded edge of each petal.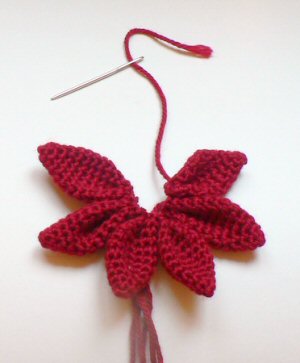
4. 4. Run the yarn through the first petal again to form a circle, pull tight and knot to keep it in position.
Styles B and C
1. Flatten out each petal/leaf.
2. Arrange one leaf over a second, so that one side of the open end of one is over the midpoint of the open end of the next, and they are arranged at approx 60 degrees (think snowflakes or slices of pie to judge the angle - you don’t have to be accurate).
3. Use a yarn needle and the long yarn end from one of the leaves to stitch them together, joining the two leaves with small stitches at the end and about a third of the way up the leaves.
4. Arrange another leaf over the top leaf, in the same position and angle, and stitch in the same way.
5. Continue until all 6 leaves are joined, and each leaf overlaps over one leaf and under another. There should be a small gap in the centre.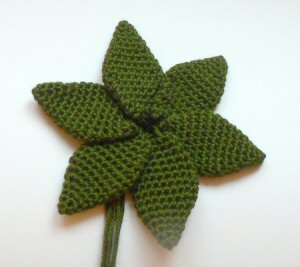
6. Pull any loose yarn ends through to the back.
Final Assembly
You should now have two (or three) rings of petals/leaves and one yellow centre. To finish assembling, arrange each layer by pulling the loose yarn ends through the centre hole of the previous layers, so they are all at the back of the flower. The layer order is (bottom to top):
Large poinsettia: C-B-A-centre
Small poinsettia: B-A-centre
Rotate the layers so their angles are offset and all the leaves are visible.
Divide the yarn ends at the back into two groups and tie the two groups in a secure knot. Depending on what you’d like to do with your flower, you can weave in all the yarn ends, leave them long to tie it onto something, or trim them down.
Nguồn: http://www.planetjune.com/blog/free-crochet-patterns/poinsettia/
14 Giỏ hoa hồng 27/4/2012, 05:00
lữ khách
Cuộn len nhỏ

Mình muốn post mẫu 1 bình hoa lên để mọi người tham khảo và hướng dẫn cách làm nhưng mà để post hình lại phải post qua 1 trang trung gian để lấy URL làm mình ngại quá, có cách nào tải trực tiếp lên trang 0 nhỉ? chị nào hay đăng hình rồi thì giúp mình với, hoa này làm cũng dễ thôi à và rất xinh nhé !
15 Re: Móc hoa 11/5/2012, 11:51
Bé SUSU
Cuộn len nhỏ

bạn ơi cho mình hỏi với làm thế nào mà bạn móc được những em búp bê xinh thế ? chỉ cho mình với được không?cuộnlenbé đã viết:
16 Re: Móc hoa 31/5/2012, 11:19
be coi
Cuộn len nhỏ

mình mới học móc mà mình rất muốn móc áo cho bé nhà mình nhưng minh không biết đọc char hình móc bạn nào có thể giúp mình không?
18 Re: Móc hoa 31/7/2012, 09:33
danka
Cuộn len nhỏ

có hướng dẫn đọc chart và các mũi móc ở phần hướng dẫn trang chính diễn đàn đó bạnbe coi đã viết:mình mới học móc mà mình rất muốn móc áo cho bé nhà mình nhưng minh không biết đọc char hình móc bạn nào có thể giúp mình không?
Diễn đàn đan móc » Móc » Mẫu móc » Móc hoa
Permissions in this forum:
Bạn không có quyền trả lời bài viết
Bài viết mới nhất
» Giới thiệu viên rửa bát Sofish thế hệ mới  31/3/2023, 14:46 bởi bepcuongthinh
» Vòi rửa bát rút dây Kagol chất lượng có tốt không 25/2/2023, 10:03 bởi bepcuongthinh
» Khuyến mãi Haloween bếp cường thịnh giảm giá sốc 28/10/2022, 08:49 bởi bepcuongthinh
» Khuyến mãi lớn đón tết trung thu 2022 18/8/2022, 09:55 bởi bepcuongthinh
» Tin khuyến mãi mới tại Bếp Cường Thịnh 17/7/2022, 14:17 bởi bepcuongthinh
» Thư mời làm đại lý nhà phân phối bếp từ Munchen 17/4/2022, 10:35 bởi bepcuongthinh
» Sử dụng khung Inox chuyển bếp từ âm sang lắp dương 10/2/2022, 09:08 bởi bepcuongthinh
» Em muốn học cách đan nối hai màu len 1/1/2022, 23:02 bởi yellow eyes kitty
» Cách làm sạch nền nhà vệ sinh nhanh gọn 9/12/2021, 14:48 bởi Boncauviglacera
 31/3/2023, 14:46 bởi bepcuongthinh
» Vòi rửa bát rút dây Kagol chất lượng có tốt không
 25/2/2023, 10:03 bởi bepcuongthinh
» Khuyến mãi Haloween bếp cường thịnh giảm giá sốc
 28/10/2022, 08:49 bởi bepcuongthinh
» Khuyến mãi lớn đón tết trung thu 2022
 18/8/2022, 09:55 bởi bepcuongthinh
» Tin khuyến mãi mới tại Bếp Cường Thịnh
 17/7/2022, 14:17 bởi bepcuongthinh
» Thư mời làm đại lý nhà phân phối bếp từ Munchen
 17/4/2022, 10:35 bởi bepcuongthinh
» Sử dụng khung Inox chuyển bếp từ âm sang lắp dương
 10/2/2022, 09:08 bởi bepcuongthinh
» Em muốn học cách đan nối hai màu len
 1/1/2022, 23:02 bởi yellow eyes kitty
» Cách làm sạch nền nhà vệ sinh nhanh gọn
 9/12/2021, 14:48 bởi Boncauviglacera
Tìm kiếm
Chú ý
Top posters
Quảng cáo

 Quy định


